
Table of Contents
Whenever you’re trying to set up a website, one of the first things you do is buy a domain name. This domain name helps direct your visitors to the location of website and its files on the internet. However, the term ENS domains is quite new to the world of domains. Hence we’re going to be discussing it at length and how you can get your very own ENS domain.
As time goes by, the internet continues to evolve from Web2 into Web3. Hence, it is important for you to focus on the future of the internet and how to take the most out of Web3 technologies.
When you take a look at the progression of different Web3 technologies such as decentralized marketplaces, and cryptocurrencies, and decentralized autonomous organizations (DAOs), you will come across the need to find a name service that can make any crypto address quickly identifiable and memorable. That’s where ENS domains come into play.
What exactly is ENS?
ENS, or Ethereum Name Service, is a secure method available to translate an Ethereum address into a piece of text, which a user can easily remember. All the ENS domain names end up with “.eth” as of now. You will be able to go ahead and register them here.
At the time of creating an Ethereum wallet, you get a 48 characters long string that contains multiple letters and numbers.
For example, 0x933……37c8
This is your public address and you can use it to send Ethereum assets into and from. However, it is impossible for anyone to remember this lengthy address.
Therefore, you will encounter some challenges as you continue to use it consistently. This is where ENS can help. You will be able to get ENS mapped to the Ethereum address. It will then become the identifier available for the specific address where the wallet is registered.
🤙🏼 Read more: How to build a decentralized website on the Ethereum Blockchain
How to search and buy ENS domains
Now you have a basic idea on what ENS domains are all about. Keeping that in mind, let’s take a look at the steps on how you can get an ENS domain.
Before proceeding with these steps, you should have a small amount of ETH in your wallet. Then you can use it to pay the ENS registration fees and transaction fees linked with your domain. Here are the steps you can follow to get the job done.
1. Open a browser that supports Ethereum
As the very first thing, you will need to open a browser with MetaMask account installed. I’d recommend Chrome with MetaMask extension built. In case you don’t have a crypto wallet, you should think about creating one.
You can instantly learn here how to create a MetaMask wallet. If you’re not thinking of making a MetaMask wallet, you can also set up a Coinbase wallet or a Trustwallet.
2. Visit ENS domains website

As a second step, type in and visit ENS domains. This is the website where you will be purchasing your ENS domain. It is a simple website where you will be able to search for ENS domains based on your preferences.
3. Locate and register your ENS
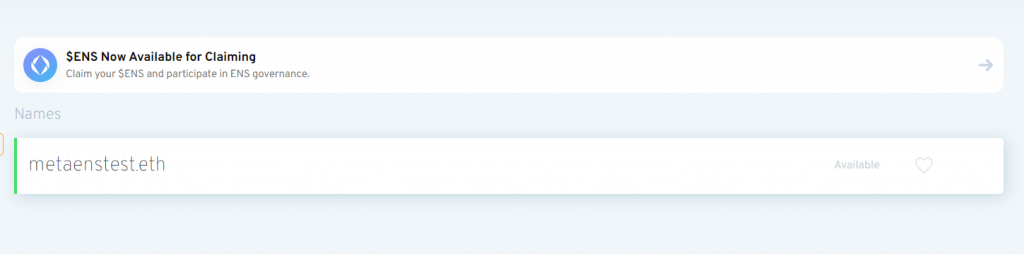
As mentioned in the previous step, you may search for the ENS domain you prefer to buy. You just need to enter the domain name, and the top level domain “.eth” will be automatically assigned.
The domain name you search for can either be available or unavailable. In case the domain name is not available, it will be possible for you to see the specific address where it is registered with. On top of that, you can also see the expiration date of the domain.
But if the domain name is available, you will be allowed to go ahead and register it. You can pay for the number of years you wish to register the domain. It is possible for you to extend the domain validity period at a later stage based on your preferences as well.
4. Confirm your domain registration

The next step would be to use your crypto wallet and complete the transaction. This is where you will be asked to pay the registration fee linked with the domain name. The fee would vary depending on the number of years you buy the domain for.
To make the payment, you should connect your ETH wallet, and you will get some prompts to sign the migration of ENS address to your account and money in the form of ETH will be deducted for this purchase too.
If you don’t know how to do that, you can refer to this guide to send money using MetaMask wallet. After making the transaction from your ETH wallet, you should wait until the ENS app confirms it.
It will take some time for ENS app to confirm the registration request. That’s because it will validate that nobody else tries to register the specific domain name at the same instance. So please, be patient and wait 🙂
5. Start using your ENS domain
Now you have an .eth domain under your name. You can share it to send, receive or store tokens in your address.
Final words
With a recent ENS update, you are now able to import your same DNS domain name to the ENS name as well. By going through this integration, you can use the ENS name in numerous other applications, which include Web3 profiles and Web3 username. This will eventually allow you to have complete key to the future Web3.
It is also important to keep in mind that all ENS domains follow the ERC-721 standard. Therefore, you will be able to continue with using them in the form of an NFT. In other words, you have the freedom to treat ENS names in a similar way on how you treat NFTs. You will therefore be able to proceed with buying, trading, selling your ENS names to other accounts, wallets, and exchanges.
When you get hold of the right ENS, there is no need to worry too much about remembering your wallet address. That’s because it is easily memorable. Finally, once everything is set and done, will be able to enhance your overall accessibility in the crypto world. Good luck!
If you have any questions, join the Metaschool Discord Server and ask our growing community anything.
Thanks for reading, see ya later! 👋🏼