Table of Contents
AI-powered customer support chatbots are getting popular among businesses these days. The growth of any business is directly related to its customers. Happy customers repeat business, provide referrals, and ultimately, act as catalysts of growth. As any business expands, managing customer requests can become a challenge if not handled efficiently. This is where AI-powered chatbots came into existence.
Imagine it’s a busy afternoon at your store, when suddenly inquiries from your store’s customer service portal start pouring in: “How can I return this item?” “Has my order been shipped?” “Could you provide the size guide for this product?” Handling these repetitive questions manually can really become an overwhelming task.

This is where chatbots become invaluable. Not only can they efficiently manage routine queries, but they also allow you and your support team to focus on more complex issues. Implementing chatbots can lead to significant cost savings; for instance, having chatbots handle customer service requests can perhaps even eliminate the need to have a support team.
Moreover, customers appreciate the prompt assistance that chatbots provide. A survey revealed that 74% of customers prefer using chatbots to address simple questions, valuing immediate responses over waiting for a human agent. By integrating a chatbot into your customer support system, you enhance customer satisfaction and boost operational efficiency. It’s a strategic move that allows you to manage customer interactions seamlessly, even during peak times, ensuring you can enjoy that cup of coffee without interruptions.
Let’s embark on creating an AI-powered customer support chatbot using OpenAI’s GPT-4 model to streamline your services and keep your customers happy.
Setting up the Development Environment
Let’s get started by setting up a space to build our project. For building our chatbot we’ll be using Python programming language, due to its simplicity for handling APIs. Firstly we need to ensure Python is installed on our system. Use the terminal to check if it is already installed by running the following command on your terminal.
python --version If you see a version number, congrats, you’re good to go. If it’s not installed, don’t panic, head over to python.org and download it on your system. I’ll wait. Got it? Cool.
Now, let’s get a few more things sorted, Ensure that you have access to the following items:
- Visual Studio or VSCode (Or any other text editor that you’re comfortable with.)
- Terminal or Command Prompt
- Basic understanding of Python
Next, we’ll create a virtual environment to manage our project dependencies. Think of a virtual environment as a safe place for all the code we’re going to write. It is nice and isolated from the rest of your system. Run the following command to create a virtual environment.
python -m venv chatbot_env

# Activate the virtual environment
source chatbot_env/bin/activate  # For Mac/Linux users
chatbot_env\\Scripts\\activate  # For Windows users
Now let’s install Flask and OpenAI, the backbone of our system as follows:
pip install openai flaskFlask will be our lightweight web framework to create the web interface, and OpenAI is, well, for the AI magic! Let’s set up the OpenAI’s API to power our system in the coming section.
Initialize the OpenAI API
Now let’s bring the brain of our system — The OpenAI API. To use OpenAI’s API, we’ll need to sign up over the OpenAl platform and create an account. After signing in, move towards the API keys section and generate a new key. Keep this key safe because it’s your golden ticket to access the GPT models.
If you face any difficulty during the signup and API key generation follow this guide to use OpenAI API to learn more about OpenAI API’s.
Now that you’ve set up the OpenAI’s API, it’s time to get to the fun part of setting the backend of our app. Let’s dive right in.
Create the backend script
In our project directory, Create a file named as app.py. All the magic happens in this file — It’s kind of like a chef’s kitchen but for code!🧑🍳 . We’ll start by initializing OpenAI’s API in this file. This is super fun, this little step will serve as the brainpower behind our customer support chatbot. Paste the following code into app.py the file:
import openai

app = Flask(__name__)

openai.api_key = 'your-api-key-here'

def generate_response(prompt):
    response = openai.ChatCompletion.create(
        model="gpt-4",
        messages=[{"role": "user", "content": prompt}],
        max_tokens=150
    )
    return response['choices'][0]['message']['content'].strip()
Here, we’re using the generate_response function to send a user’s query(prompt) to the OpenAl’s API. The API returns a beautifully crafted response and it will be sent back to the user. Remember to replace 'your-api-key-here' with your API key generated in the previous section.
With that, we ensure the brain of our customer support chatbot is working. It feels like you’re creating your virtual assistant, isn’t it?👨💻
Creation of a web interface
Now that we have set up the brain behind our chatbot, it’s time to build an interface where customers can actually interact with our chatbot. We’ll use Flask, a web framework that supports us when we just want to get things done without the headache of external dependencies. In app.py, add the the following code:
from flask import Flask, render_template, request

app = Flask(__name__)

@app.route('/', methods=['GET', 'POST'])
def index():
    chatbot_response = None
    if request.method == 'POST':
        user_input = request.form['user_input']
        chatbot_response = generate_response(user_input)  # Generate chatbot response
    return render_template('index.html', chatbot_response=chatbot_response)

if __name__ == '__main__':
    app.run(debug=True)
Now we are done with the backend part of the web interface, let’s build the face of our chatbot. Create a folder named templates and inside it create a file index.html by using the following commands:
mkdir templates
cd templates

# For Mac/Linux users
touch index.html

# For Windows user
echo. > index.html  # Using command prompt
New-Item -Path index.html -ItemType File # Using PowerShell
Now paste the following code inside the index.html file:
<!DOCTYPE html>
<html lang="en">
<head>
<meta charset="UTF-8">
<meta name="viewport" content="width=device-width, initial-scale=1.0">
<title>AI Customer Support Chatbot</title>
</head>
<body>
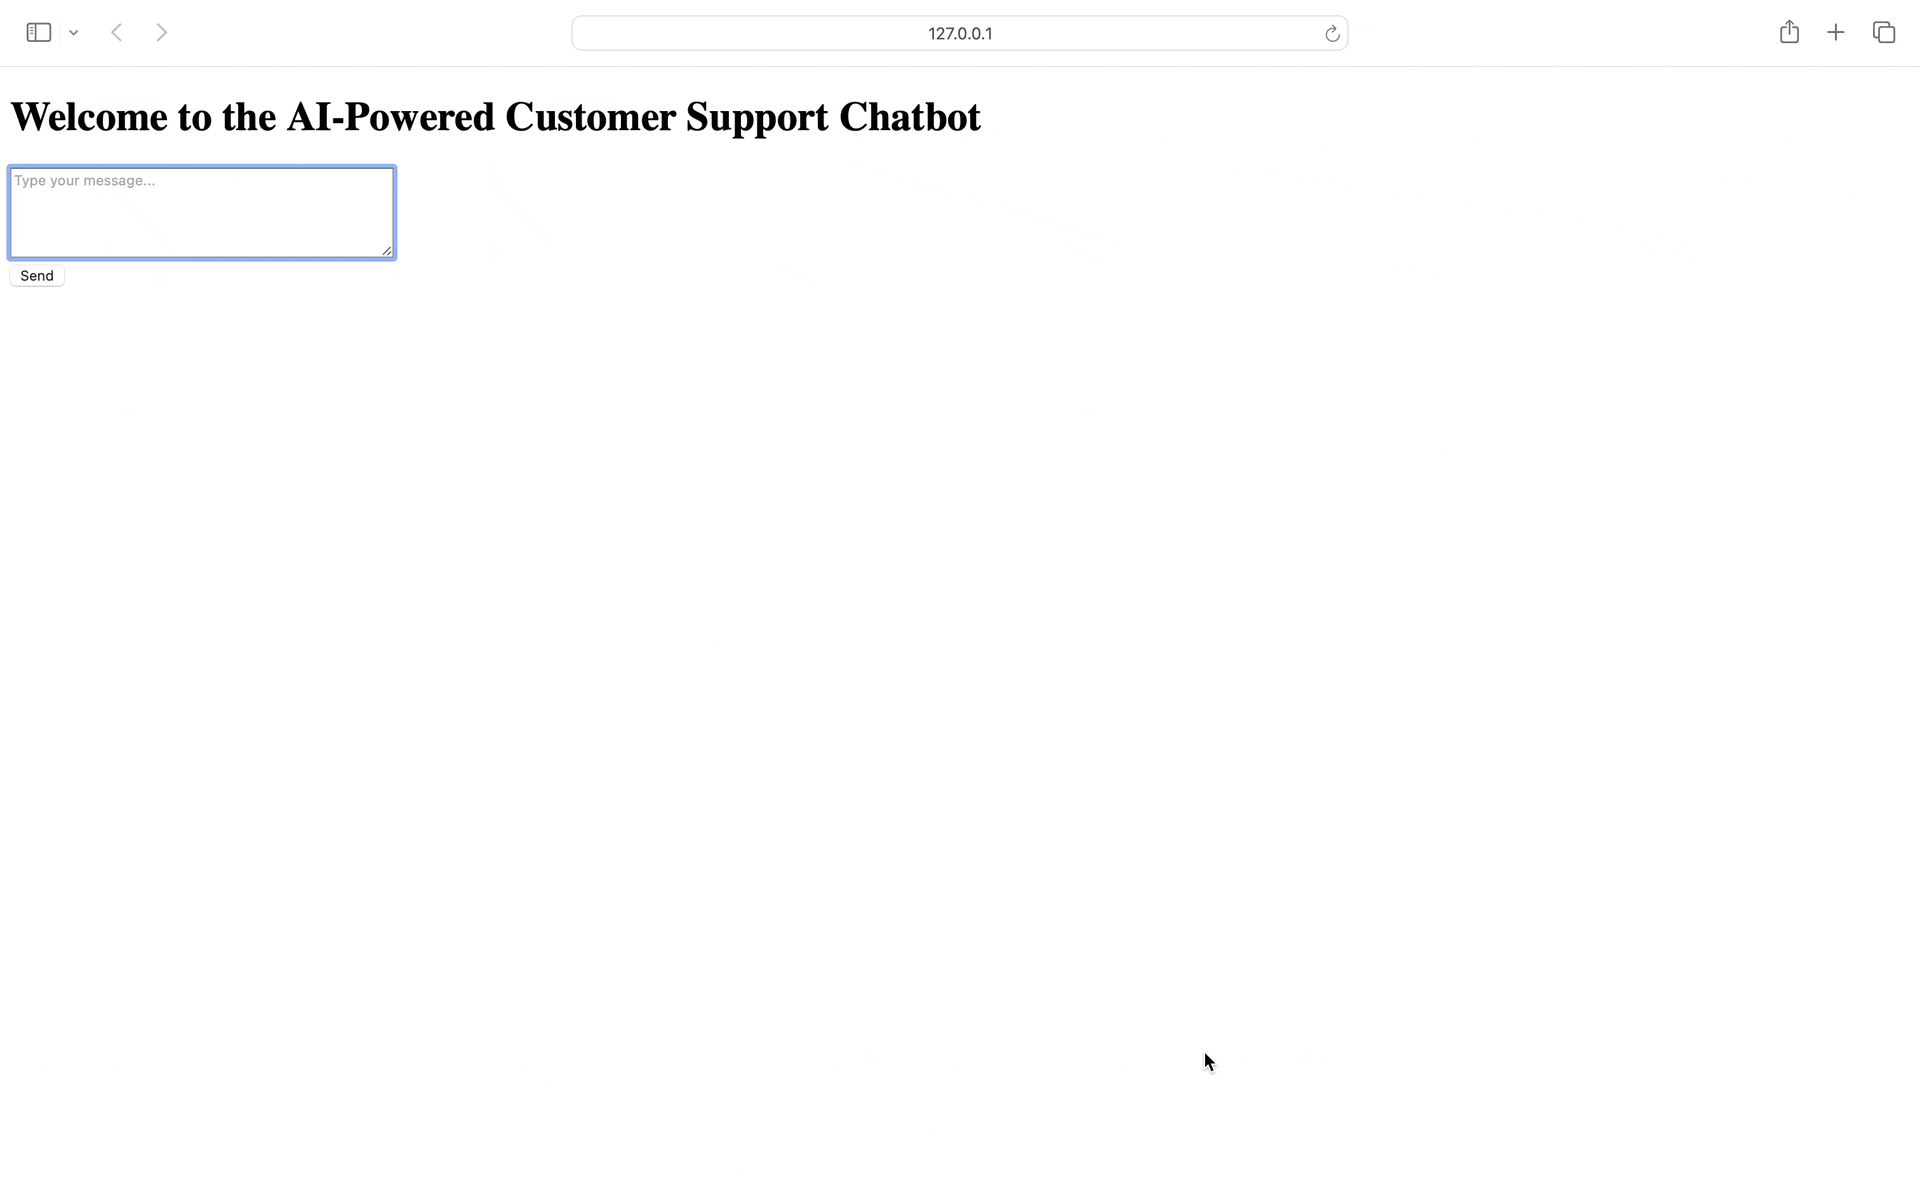
<h1>Welcome to the AI-Powered Customer Support Chatbot</h1>
<form method="POST" action="/">
<textarea name="user_input" rows="5" cols="40" placeholder="Type your message..."></textarea><br>
<input type="submit" value="Send">
</form>
<!-- Display the chatbot response if available -->
{% if chatbot_response %}
<h2>Chatbot's Response:</h2>
<p>{{ chatbot_response }}</p>
{% endif %}
</body>
</html>This will launch an interface where users can type their questions and get their queries answered.
Running our application
Now it’s time to run our application and utilize our AI-powered customer support chatbot in action.
Start our Flask development server by running the following command:
python app.pyIt will start the server and launch the app at http://127.0.0.1:5000/. We’ll see an interface of our customer support chatbot. Type in your query and it will be answered in no time, thanks to the power of OpenAI!
Note: If you ran into any bugs during the production, don’t panic! Debugging is a part of development journey, and it will make you better as a builder.💪
Congratulations! You’ve built a simple but powerful AI-powered customer support chatbot. We have used the OpenAI GPT-4 model to accomplish this AI-powered customer support chatbot. It allows developers to input their code, receive feedback, and make instant improvements based on the provided suggestions.
Look at you, you have just built a powerful customer support chatbot from scratch! This landmark can help you streamline your customer service and also polish your coding skills during this journey.
You can customize this customer support chatbot as per the requirements of your business, you can tweak the response settings or add multiple features like saving the user’s history to understand their requirements. The possibilities with this chatbot are endless, and your journey is just getting started. Keep coding and enjoy your newly found chatbot superpowers! 🚀
Explore more on Metaschool
If you found building an AI-powered code review assistant helpful, you might be interested in exploring more hands-on projects to expand your skills. Check out our other courses on Metaschool:
- Build an AI Dating Coach Using NextJS and OpenAI: Ever thought about creating an app that provides personalized dating advice? This course guides you through building a dating coach app that uses OpenAI’s API and NextJS to deliver insightful advice to users.
- Build a YeBot with OpenAI API: Learn how to create a sophisticated chatbot using OpenAI’s powerful API, perfect for enhancing your understanding of AI-driven applications.
- Build a Code Translator Using NextJS and OpenAI API: Dive into building a code translation tool using NextJS and OpenAI, a great way to apply your knowledge in a practical and innovative way.
Explore these courses and more to continue your journey in AI on the Metaschool platform!
FAQs
What is the benefit of using an AI-powered chatbot for customer support?
AI chatbots can handle multiple queries simultaneously, provide 24/7 support, and reduce response times, improving customer satisfaction and freeing up human agents for more complex tasks.
Do I need advanced coding skills to build a customer support chatbot with OpenAI?
No, basic knowledge of Python and API integration is sufficient. This article walks you through the entire process step-by-step, making it beginner-friendly.
Can I customize the chatbot’s responses to match my business’s tone and style?
Yes! You can tailor the prompts to OpenAI to reflect your business’s tone, style, and branding, ensuring the chatbot aligns with your customer service voice. Through prompt engineering, you can guide the chatbot to respond in specific ways. For more advanced customization, you could also fine-tune an AI model using data from your business, allowing the chatbot to understand your unique tone, language, and preferred responses, creating a more personalized customer experience.