Table of Contents
Imagine this: your code sails through manual review, gets deployed to production, and suddenly—everything starts breaking. Debugging reveals issues that went unnoticed, leaving you wondering, What went wrong? Despite the best efforts of manual reviews, subtle errors and overlooked nuances can still sneak through, jeopardizing the stability of your application.

Even if you are an expert, trying to manually debug a code is not an easy feat. Wouldn’t it be great if you had an intelligent assistant that could catch issues before they escalate or worse — go to production, unnoticed?
Well, guess what, today is your lucky day! We are going to build a code review assistant using the OpenAI’s GPT-4 model. Our assistant will analyze the provided code, highlight code that can potentially cause errors, and even provide suggestions for improving code based on coding standards.
By the end of this guide, you will have a functional web-based code-reviewing tool that can assist you in reviewing and improving your code. Let’s dive in!
Setting Up the Development Environment
Before we start developing our application, we need to set up an environment that is suitable for AI integration and web application development. We’re going to use Flask for our web framework, Python as a background programming language, and HTML to build our frontend. Of course, we’ll be using OpenAI’s API to power the brain of our code review assistant.
But First, What is Flask?
Imagine you’re constructing a resort. Python is your trusty toolbox filled with all the advanced tools you need, but to build something functional, you also need a solid foundation. That’s where Flask steps in—it’s like the blueprint that helps you quickly construct a simple yet sturdy structure. In our case, it’s the framework that allows us to build a small app with ease.
Flask is a lightweight web framework designed to let you get things done without the hassle of dealing with heavy external dependencies. It gives you just what you need—no more, no less—so you can focus on building your application efficiently.
Now, let’s gather our tools and get started by installing Python and Flask!
Install Python and Flask
Firstly we need to ensure Python is installed on our system. Use the terminal to check if it is already installed by running the following command on our terminal.
python --versionIf you see a version number just pops up, congrats, you’re good to go. If it’s not installed, don’t panic, head over to python.org and download it on your system.
Once it is sorted, now open your terminal and create a new project directory as follows:
mkdir code-review-assistant
cd code-review-assistant
Next, we’ll create a virtual environment to manage our project dependencies. Think a virtual environment as a safe place for all the code we’re going to write. It is nice and isolated from the rest of your system. Run the following command to create a virtual environment.
python -m venv venv
source venv/bin/activate  # For Windows: venv\Scripts\activate
Now let’s install Flask and OpenAI, the backbone of our system as follows.
pip install flask openaiGet Your OpenAI API key
Now let’s bring the brain of our system —the OpenAI API. To use OpenAI’s API, we’ll need to signup over the OpenAl platform and create an account. After signing in, move towards the API keys section and generate a new key. We’ ll use this key later in our code.
If you face any difficulty in during the signup and API key generation follow this guide to use OpenAI API. Now that we have the API key, let’s see how we can utilize it in the next section.
Initialize the OpenAI API
As we have access to our brand new API key, its time to setup our backend so our code review assistant can chat with our GPT model. This initialization process will allow our code reviewing assistant to send requests to the GPT model. We will setup a backend script to handle requests from the front end and interact with the AI model. We’ll also configure API key and use environment variables to ensure API key is not exposed and easily manageable inside our application.
Create the Backend Script
In our project folder, create a new Python file called app.py. We can create it using the following command:
# For Mac user
touch app.py

# For Windows user
echo. > app.py  # Using command prompt
New-Item -Path app.py -ItemType File # Using PowerShell
This file will serve as the brain of our operations. Open app.py and add the following code:
import os
import openai
from flask import Flask, request, jsonify

app = Flask(__name__)

# Load OpenAI API key from environment variables
openai.api_key = os.getenv("OPENAI_API_KEY")

@app.route("/review", methods=["POST"])
def review_code():
    # Get the code submitted from the frontend
    code = request.json.get("code")

    if not code:
        return jsonify({"error": "No code provided"}), 400

    # Request GPT-4 to review the provided code
    response = openai.Completion.create(
        model="text-davinci-003",
        prompt=f"Review the following code and suggest improvements:\n\n{code}",
        max_tokens=500,
        temperature=0.7
    )

    feedback = response.choices[0].text.strip()

    return jsonify({"feedback": feedback})

if __name__ == "__main__":
    app.run(debug=True)
To keep our application secure, it’s crucial to manage it properly as we’ll do in the coming section.
Configure API key and Environment Variables
We need to ensure the API key remains secured throughout the process. To securely use our API, we can set it as an environment variable. We need to create a .env file in our project directory by using the following command:
echo “OPENAI_API_KEY=your-openai-api-key” > .env
To ensure our application can read this API key. We can use python-dotenv to manage this process as follows:
pip install python-dotenvNext, modify the app.py to load our environment variables from the .env file:
from dotenv import load_dotenv

# Load environment variables
load_dotenv()
This activity will ensure our API will remain secure while allowing the application to interact with OpenAI’s API.
As the backend part of our application is complete, let’s shift our focus to creating the frontend part of our application.
Creating the Web Interface
Let’s create a simple interface so any user can submit their code for review and receive AI powered feedback.
Creation of HTML File
Inside our project folder, create a new folder named templates. Inside this new folder, create an HTML file named index.html.
mkdir templates
touch templates/index.html
In index.html, add the following code to create a simple user interface.
 <title>Code Review Assistant</title>

        body {
            font-family: Arial, sans-serif;
            padding: 20px;
            background-color: #f4f4f9;
        }
        .container {
            max-width: 800px;
            margin: 0 auto;
        }
        textarea {
            width: 100%;
            height: 200px;
            margin-bottom: 20px;
            padding: 10px;
            border: 1px solid #ccc;
        }
        button {
            padding: 10px 20px;
            background-color: #007bff;
            color: white;
            border: none;
            cursor: pointer;
        }
        .feedback {
            margin-top: 20px;
            background-color: #f8f9fa;
            padding: 20px;
            border: 1px solid #ccc;
        }

    <div class="container">
        <h1>AI Code Review Assistant</h1>
        <textarea id="code-input"></textarea>
        <button>Submit for Review</button>
        <div id="feedback" class="feedback"></div>
    </div>

        function submitCode() {
            const code = document.getElementById('code-input').value;
            fetch('/review', {
                method: 'POST',
                headers: {
                    'Content-Type': 'application/json',
                },
                body: JSON.stringify({ code }),
            })
            .then(response => response.json())
            .then(data => {
                document.getElementById('feedback').innerText = data.feedback;
            })
            .catch((error) => {
                console.error('Error:', error);
            });
        }
Link the Frontend to the Backend
To connect the dots, add the following code to the app.py file to serve this HTML page when the root URL is accessed.
@app.route("/")
def index():
    return render_template("index.html")
It will render index.html as the homepage of our application, allowing users to interact with AI code reviewers. With everything now set up, let’s test our application.
Running the Application
It’s finally time to run our application and see our AI code review assistant in action. Start the Flask development server by running the following command:
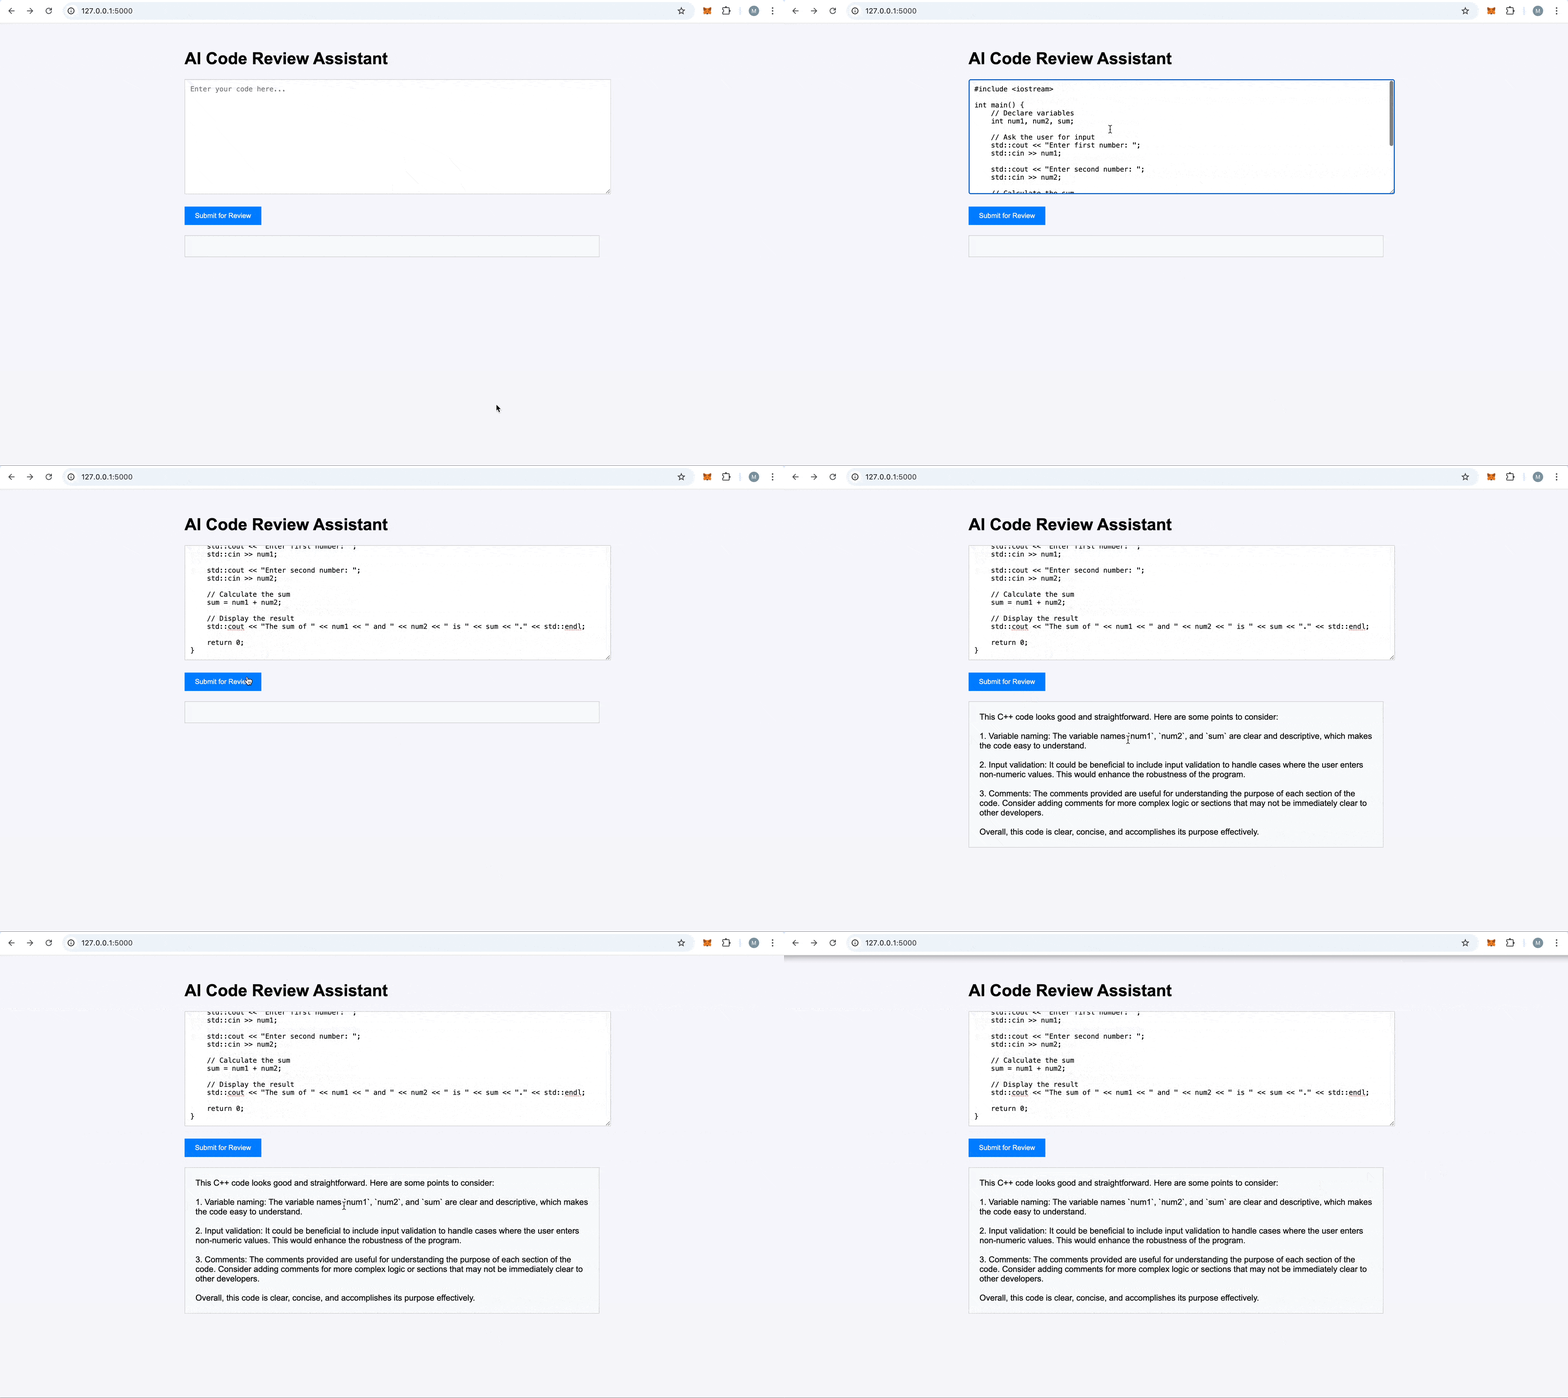
python app.pyIt will start the server on http://127.0.0.1:5000/. We can open this link to observe our web interface. We’ll see a text area where we can paste our code. Once we click the “Submit for Review” button, the AI will analyze the code and provide feedback under the button.

Congratulations! You’ve successfully built a simple yet powerful AI-driven code review assistant using OpenAI’s GPT-4 model. This tool empowers developers to input their code, receive instant feedback, and make meaningful improvements based on intelligent suggestions, paving the way for enhanced productivity and better code quality.
While this version is a foundational implementation, it holds immense potential for growth. Imagine extending its capabilities by integrating version control systems like GitHub, enabling collaborative reviews, or even enhancing it to identify and complete missing logic within the code. The possibilities are limitless, and this project is just the beginning.
By embracing AI as our trusted code review partner, we can streamline development, reduce errors, and elevate our coding experience with minimal effort. The future of smarter, more efficient coding starts here—so keep building, innovating, and coding!
Explore More on Metaschool
If you found building an AI-powered code review assistant helpful, you might be interested in exploring more hands-on projects to expand your skills. Check out our other courses on Metaschool:
- Build a YeBot with OpenAI API: Learn how to create a sophisticated chatbot using OpenAI’s powerful API, perfect for enhancing your understanding of AI-driven applications.
- Build a Code Translator Using NextJS and OpenAI API: Dive into building a code translation tool using NextJS and OpenAI, a great way to apply your knowledge in a practical and innovative way.
Explore these courses and more to continue your journey in AI on the Metaschool platform!
FAQs
Can I customize the feedback provided by the AI in the code review assistant?
Yes, you can customize the assistant’s behavior by modifying the prompts and system messages to tailor the feedback based on your specific requirements and coding standards.
How do I set up the OpenAI API for my project?
To set up the OpenAI API, you need to create an account on OpenAI, obtain your API key, and install the OpenAI Python package in your development environment.
What is a code review assistant and how does it work?
A code review assistant uses AI to analyze code submissions, providing feedback on style, functionality, and potential bugs to improve code quality.
