Table of Contents
The world of cryptocurrency has evolved far beyond simple transactions. Today, one of the most compelling aspects of crypto is the ability to earn passive income through staking. But what exactly is staking, and why should we build a platform? Think of staking as the crypto equivalent of earning interest on a savings account, but with a crucial difference – instead of trusting a bank, you’re participating directly in a blockchain network’s operation. When users stake their tokens, they’re essentially putting up collateral to help secure the network, and in return, they earn rewards.
Why Build Your Own Staking Platform?
You might wonder why we should build a staking platform when there are already existing solutions. The answer lies in control, customization, and understanding. By building your own platform, you gain intimate knowledge of how staking works from the ground up. More importantly, you can create features that existing platforms might lack, implement your own reward mechanisms, and ensure the security of your users’ funds through carefully crafted code.
The current staking landscape has several pain points. Many platforms are overly complex, have high minimum staking requirements, or lack transparency. By building our solution, we can address these issues head-on and create something that truly serves our users’ needs.
Planning Our Approach
Before we write a single line of code, let’s think about what our platform needs to accomplish. At its core, a staking platform needs to:

- Accept user deposits of tokens
- Lock these tokens for a specified period
- Calculate and distribute rewards
- Allow users to withdraw their stakes and rewards when conditions are met
But the technical implementation of these features requires careful consideration. We’ll need smart contracts to handle the blockchain interactions, a frontend interface for users to interact with these contracts, and potentially a backend service to track and display staking statistics.
Choosing Our Technology Stack
The choice of technology stack is crucial for building a robust staking platform. For smart contracts, we’ll use Solidity – the industry standard for Ethereum development. It’s battle-tested, well-documented, and has a large community for support.
For development and testing, we’ll use Hardhat as our development environment. Hardhat provides powerful debugging features, a testing framework, and excellent plugin support. This choice will make our development process smoother and more efficient.
On the frontend, React makes the most sense. Its component-based architecture perfectly suits our needs for building a responsive and interactive user interface. We’ll pair it with ethers.js for blockchain interactions – a library chosen for its reliability and excellent TypeScript support.
Setting Up Our Development Environment
Let’s start by setting up our development environment. First, create a new directory for your project and initialize it with npm:
mkdir staking-platform
cd staking-platform
npm init -y
Now we’ll install our core dependencies:
npm install hardhat @openzeppelin/contracts ethers
npm install -D typescript ts-node @types/node
These tools form the foundation of our development environment. Hardhat will handle our smart contract compilation and testing, while OpenZeppelin provides secure, standard contract implementations on which we can build.
Understanding Smart Contract Architecture
The heart of our staking platform lies in its smart contracts. We need to think carefully about how these contracts will interact with each other and with our users. The main components are:
- A staking contract that handles deposits and withdrawals
- A reward calculation mechanism
- A token contract (since we will be creating our token)
Considering security while writing smart contracts is a very important factor to keep in mind. Test case scenarios need to be taken in consideration. While building a staking platform we need to consider scenarios like:
- What happens if a user tries to withdraw early?
- How do we prevent the manipulation of reward calculations?
- What safeguards do we need against reentrancy attacks?
Let’s look at the basic structure of our staking contract:
// SPDX-License-Identifier: MIT
pragma solidity ^0.8.0;

import "@openzeppelin/contracts/token/ERC20/IERC20.sol";
import "@openzeppelin/contracts/security/ReentrancyGuard.sol";
import "@openzeppelin/contracts/access/Ownable.sol";

contract StakingPlatform is ReentrancyGuard, Ownable {
    IERC20 public stakingToken;

    // Staking settings
    uint256 public minimumStakingAmount = 100 * 10**18; // 100 tokens minimum
    uint256 public rewardRate = 10; // 10% APR
    uint256 public totalRewardsDistributed;

    struct Stake {
        uint256 amount;
        uint256 timestamp;
        uint256 lastRewardCalculation;
    }

    mapping(address => Stake) public stakes;
    uint256 public totalStaked;
Building the Core Staking Logic
The core logic for the staking platform needs to handle several key functions like staking, withdrawing, and calculating rewards, as well as some admin functions like setting the minimum staking amount and setting up the reward rate. We will look into each one of them step by step. First, let us implement a staking function where users need to be able to stake their tokens. This involves transferring tokens from their wallet to our contract:
function stake(uint256 _amount) external nonReentrant {
        require(_amount >= minimumStakingAmount, "Amount below minimum staking amount");
        require(stakingToken.transferFrom(msg.sender, address(this), _amount), "Transfer failed");

        if (stakes[msg.sender].amount > 0) {
            // Calculate and add pending rewards to stake
            uint256 reward = calculateReward(msg.sender);
            stakes[msg.sender].amount += reward;
        }

        stakes[msg.sender].amount += _amount;
        stakes[msg.sender].timestamp = block.timestamp;
        stakes[msg.sender].lastRewardCalculation = block.timestamp;
        totalStaked += _amount;

        emit Staked(msg.sender, _amount);
    }
Reward Calculation Mechanism
One of the most complex aspects of a staking platform is calculating rewards fairly and efficiently. We need to consider:
- Should rewards be calculated in real-time or periodically?
- How do we handle different staking durations?
- What happens to rewards when users add to their stake?
A simple reward calculation might look like this:
function calculateReward(address _staker) public view returns (uint256) {
        if (stakes[_staker].amount == 0) return 0;

        uint256 stakingDuration = block.timestamp - stakes[_staker].lastRewardCalculation;
        uint256 reward = (stakes[_staker].amount * rewardRate * stakingDuration) / (365 days * 100);

        return reward;
    }
However, this basic calculation doesn’t account for many real-world considerations. We need to think about:
- Gas efficiency for large numbers of users staking on the platform
- Precision loss in calculations
- Fairness in reward distribution
Setting up Admin Functions
We need to write some functions that should only be controlled by the caller of the smart contract and no discrepancy is created. For example in this scenario we need a function to set up the minimum staking amount and setting up the reward rate for our staking platform
function setMinimumStakingAmount(uint256 _amount) external onlyOwner {
        minimumStakingAmount = _amount;
    }

    function setRewardRate(uint256 _rate) external onlyOwner {
        rewardRate = _rate;
    }
You would have noticed that in the tiny bits of code that we have shared, there are emit functions being called. For every emit and event is triggered and thus we have an event that needs to be created.
Note: emit is a keyword used to trigger events. These events are inheritable members of contracts. When you use emit , followed by the event name and its parameters, it logs the event to the blockchain. This means that the event is stored on the blockchain and can be accessed and listened to externally
This is how our entire code for the Staking Platform will look like :
// SPDX-License-Identifier: MIT
pragma solidity ^0.8.0;

import "@openzeppelin/contracts/token/ERC20/IERC20.sol";
import "@openzeppelin/contracts/security/ReentrancyGuard.sol";
import "@openzeppelin/contracts/access/Ownable.sol";

contract StakingPlatform is ReentrancyGuard, Ownable {
    IERC20 public stakingToken;

    // Staking settings
    uint256 public minimumStakingAmount = 100 * 10**18; // 100 tokens minimum
    uint256 public rewardRate = 10; // 10% APR
    uint256 public totalRewardsDistributed;

    struct Stake {
        uint256 amount;
        uint256 timestamp;
        uint256 lastRewardCalculation;
    }

    mapping(address => Stake) public stakes;
    uint256 public totalStaked;

    event Staked(address indexed user, uint256 amount);
    event Withdrawn(address indexed user, uint256 amount);
    event RewardPaid(address indexed user, uint256 reward);
    event RewardsAdded(uint256 amount);

    constructor(address _stakingToken) {
        stakingToken = IERC20(_stakingToken);
    }

    // Function to add rewards to the contract
    function addRewards(uint256 _amount) external {
        require(stakingToken.transferFrom(msg.sender, address(this), _amount), "Transfer failed");
        emit RewardsAdded(_amount);
    }

    function stake(uint256 _amount) external nonReentrant {
        require(_amount >= minimumStakingAmount, "Amount below minimum staking amount");
        require(stakingToken.transferFrom(msg.sender, address(this), _amount), "Transfer failed");

        if (stakes[msg.sender].amount > 0) {
            // Calculate and add pending rewards to stake
            uint256 reward = calculateReward(msg.sender);
            stakes[msg.sender].amount += reward;
        }

        stakes[msg.sender].amount += _amount;
        stakes[msg.sender].timestamp = block.timestamp;
        stakes[msg.sender].lastRewardCalculation = block.timestamp;
        totalStaked += _amount;

        emit Staked(msg.sender, _amount);
    }

    function withdraw(uint256 _amount) external nonReentrant {
        require(stakes[msg.sender].amount >= _amount, "Insufficient staked amount");

        // Calculate rewards before withdrawal
        uint256 reward = calculateReward(msg.sender);
        uint256 totalAmount = _amount + reward;

        // Update state before transfer
        stakes[msg.sender].amount -= _amount;
        totalStaked -= _amount;
        stakes[msg.sender].lastRewardCalculation = block.timestamp;
        totalRewardsDistributed += reward;

        // Ensure contract has enough balance
        require(stakingToken.balanceOf(address(this)) >= totalAmount, "Insufficient contract balance");
        require(stakingToken.transfer(msg.sender, totalAmount), "Transfer failed");

        emit Withdrawn(msg.sender, _amount);
        if (reward > 0) {
            emit RewardPaid(msg.sender, reward);
        }
    }

    function calculateReward(address _staker) public view returns (uint256) {
        if (stakes[_staker].amount == 0) return 0;

        uint256 stakingDuration = block.timestamp - stakes[_staker].lastRewardCalculation;
        uint256 reward = (stakes[_staker].amount * rewardRate * stakingDuration) / (365 days * 100);

        return reward;
    }

    function getStakeInfo(address _staker) external view returns (
        uint256 stakedAmount,
        uint256 stakingTime,
        uint256 pendingRewards
    ) {
        Stake memory stake = stakes[_staker];
        return (
            stake.amount,
            stake.timestamp,
            calculateReward(_staker)
        );
    }

    // Admin functions
    function setMinimumStakingAmount(uint256 _amount) external onlyOwner {
        minimumStakingAmount = _amount;
    }

    function setRewardRate(uint256 _rate) external onlyOwner {
        rewardRate = _rate;
    }
}
Before you jump into building the front end of the staking platform we need to write one more smart contract and that would be for building our token that we will be using in the staking platform.
Write your token smart contract
While writing a token smart contract we will be using Openzepplin’s ERC20 framework and importing it reduces the code to merely 6-7 lines. We will be creating a Cosmic Token and then use it in our staking platform to stake, reward, and withdraw tokens.
// SPDX-License-Identifier: MIT
pragma solidity ^0.8.0;

import "@openzeppelin/contracts/token/ERC20/ERC20.sol";
import "@openzeppelin/contracts/access/Ownable.sol";

contract StakingToken is ERC20, Ownable {
    constructor() ERC20("Cosmic Token", "COSMIC") {
        // Mint initial supply to the contract deployer
        _mint(msg.sender, 1000000 * 10**decimals());
    }

    function mint(address to, uint256 amount) external onlyOwner {
        _mint(to, amount);
    }
}
If you are an absolute beginner in web3 and have stumbled upon this article here are a few resources to get started with your web3 journey on Ethereum and guess what we also have a course on how to create your own tokens in 30 minutes.
Ethereum
Metaschool’s hands-on Ethereum development courses are offered for free. These self-paced and structured courses guide you to write Smart Contracts in Solidity, build NFTs, and teach you to create your own Ethereum Token in 30 mins with expert instruction and a guided learning environment. Developers at every stage of their learning journey will benefit from Metaschool’s Ethereum blockchain track and learn to build dApps quickly.

Building the User Interface
The smart contract is only half the battle. Users need a clean, intuitive interface to interact with our platform. Our frontend needs to:
- Connect to user’s wallets
- Display staking options clearly
- Show real-time reward calculations
- Bonus: Add a slider button to be able to choose the number of tokens you want to stake

Testing our smart contract
Writing test cases for our smart contract is considered to be a good practice. Unit testing involves checking individual units or components of your code to ensure they function as intended. For smart contracts, this means testing specific functions, interactions, and behaviors in a controlled environment before deploying the contract on a live blockchain. For our staking platform, we will be writing unit tests for checking edge cases like:
- Basic functionality (staking, withdrawing)
- Edge cases (zero amounts, maximum values)
- Security scenarios (attack vectors)
- Reward calculations accuracy
const { expect } = require("chai");
const { ethers } = require("hardhat");

describe("Staking Platform", function () {
  let StakingToken;
  let stakingToken;
  let StakingPlatform;
  let stakingPlatform;
  let owner;
  let addr1;
  let addr2;

  // Helper function to move time forward
  async function moveTime(seconds) {
    await network.provider.send("evm_increaseTime", [seconds]);
    await network.provider.send("evm_mine");
  }

  beforeEach(async function () {
    // Get test accounts
    [owner, addr1, addr2] = await ethers.getSigners();

    // Deploy StakingToken
    StakingToken = await ethers.getContractFactory("StakingToken");
    stakingToken = await StakingToken.deploy();
    await stakingToken.deployed();

    // Deploy StakingPlatform
    StakingPlatform = await ethers.getContractFactory("StakingPlatform");
    stakingPlatform = await StakingPlatform.deploy(stakingToken.address);
    await stakingPlatform.deployed();

    // Transfer tokens to test accounts and staking platform
    await stakingToken.transfer(addr1.address, ethers.utils.parseEther("1000"));
    await stakingToken.transfer(addr2.address, ethers.utils.parseEther("1000"));

    // Add rewards to the staking platform
    await stakingToken.approve(stakingPlatform.address, ethers.utils.parseEther("10000"));
    await stakingPlatform.addRewards(ethers.utils.parseEther("1000")); // Add 1000 tokens as rewards
  });

  describe("Deployment", function () {
    it("Should set the right token address", async function () {
      expect(await stakingPlatform.stakingToken()).to.equal(stakingToken.address);
    });

    it("Should set the right owner", async function () {
      expect(await stakingPlatform.owner()).to.equal(owner.address);
    });
  });

  describe("Staking", function () {
    beforeEach(async function () {
      // Approve staking platform to spend tokens
      await stakingToken.connect(addr1).approve(stakingPlatform.address, ethers.utils.parseEther("1000"));
    });

    it("Should allow staking above minimum amount", async function () {
      const stakeAmount = ethers.utils.parseEther("100");
      await expect(stakingPlatform.connect(addr1).stake(stakeAmount))
        .to.emit(stakingPlatform, "Staked")
        .withArgs(addr1.address, stakeAmount);

      const stake = await stakingPlatform.stakes(addr1.address);
      expect(stake.amount).to.equal(stakeAmount);
    });

    it("Should reject staking below minimum amount", async function () {
      const stakeAmount = ethers.utils.parseEther("50");
      await expect(
        stakingPlatform.connect(addr1).stake(stakeAmount)
      ).to.be.revertedWith("Amount below minimum staking amount");
    });
  });

  describe("Rewards", function () {
    beforeEach(async function () {
      await stakingToken.connect(addr1).approve(stakingPlatform.address, ethers.utils.parseEther("1000"));
      await stakingPlatform.connect(addr1).stake(ethers.utils.parseEther("100"));
    });

    it("Should calculate rewards correctly", async function () {
      // Move time forward by 365 days
      await moveTime(365 * 24 * 60 * 60);

      const reward = await stakingPlatform.calculateReward(addr1.address);
      // Expected reward should be 10% of staked amount after 1 year
      expect(reward).to.be.closeTo(
        ethers.utils.parseEther("10"), // 10% of 100 tokens
        ethers.utils.parseEther("0.1") // Allow for small rounding differences
      );
    });

    it("Should track total rewards distributed", async function () {
      await moveTime(365 * 24 * 60 * 60);
      await stakingPlatform.connect(addr1).withdraw(ethers.utils.parseEther("100"));

      expect(await stakingPlatform.totalRewardsDistributed()).to.be.closeTo(
        ethers.utils.parseEther("10"),
        ethers.utils.parseEther("0.1")
      );
    });
  });

  describe("Withdrawals", function () {
    beforeEach(async function () {
      await stakingToken.connect(addr1).approve(stakingPlatform.address, ethers.utils.parseEther("1000"));
      await stakingPlatform.connect(addr1).stake(ethers.utils.parseEther("100"));
    });

    it("Should allow full withdrawal with rewards", async function () {
      // Move time forward by 365 days
      await moveTime(365 * 24 * 60 * 60);

      const initialBalance = await stakingToken.balanceOf(addr1.address);
      await stakingPlatform.connect(addr1).withdraw(ethers.utils.parseEther("100"));
      const finalBalance = await stakingToken.balanceOf(addr1.address);

      // Should receive original stake plus ~10% reward
      expect(finalBalance.sub(initialBalance)).to.be.closeTo(
        ethers.utils.parseEther("110"),
        ethers.utils.parseEther("0.1")
      );
    });

    it("Should prevent withdrawal of more than staked amount", async function () {
      await expect(
        stakingPlatform.connect(addr1).withdraw(ethers.utils.parseEther("200"))
      ).to.be.revertedWith("Insufficient staked amount");
    });

    it("Should fail if contract has insufficient balance", async function () {
      // Deploy new instance without rewards
      const newStakingPlatform = await StakingPlatform.deploy(stakingToken.address);
      await stakingToken.connect(addr1).approve(newStakingPlatform.address, ethers.utils.parseEther("1000"));
      await newStakingPlatform.connect(addr1).stake(ethers.utils.parseEther("100"));

      await moveTime(365 * 24 * 60 * 60);

      await expect(
        newStakingPlatform.connect(addr1).withdraw(ethers.utils.parseEther("100"))
      ).to.be.revertedWith("Insufficient contract balance");
    });
  });

  describe("Admin Functions", function () {
    it("Should allow owner to change minimum staking amount", async function () {
      const newMinimum = ethers.utils.parseEther("200");
      await stakingPlatform.connect(owner).setMinimumStakingAmount(newMinimum);
      expect(await stakingPlatform.minimumStakingAmount()).to.equal(newMinimum);
    });

    it("Should allow owner to change reward rate", async function () {
      const newRate = 20; // 20% APR
      await stakingPlatform.connect(owner).setRewardRate(newRate);
      expect(await stakingPlatform.rewardRate()).to.equal(newRate);
    });

    it("Should prevent non-owner from changing parameters", async function () {
      await expect(
        stakingPlatform.connect(addr1).setRewardRate(20)
      ).to.be.revertedWith("Ownable: caller is not the owner");
    });
  });
});
Deployment
There are multiple ways to go for deployment. You can either use RemixIDE for smart contract deployment or do it locally. In this case, we prefer to do it locally as we have to test the code working well with the the frontend of our application as well.
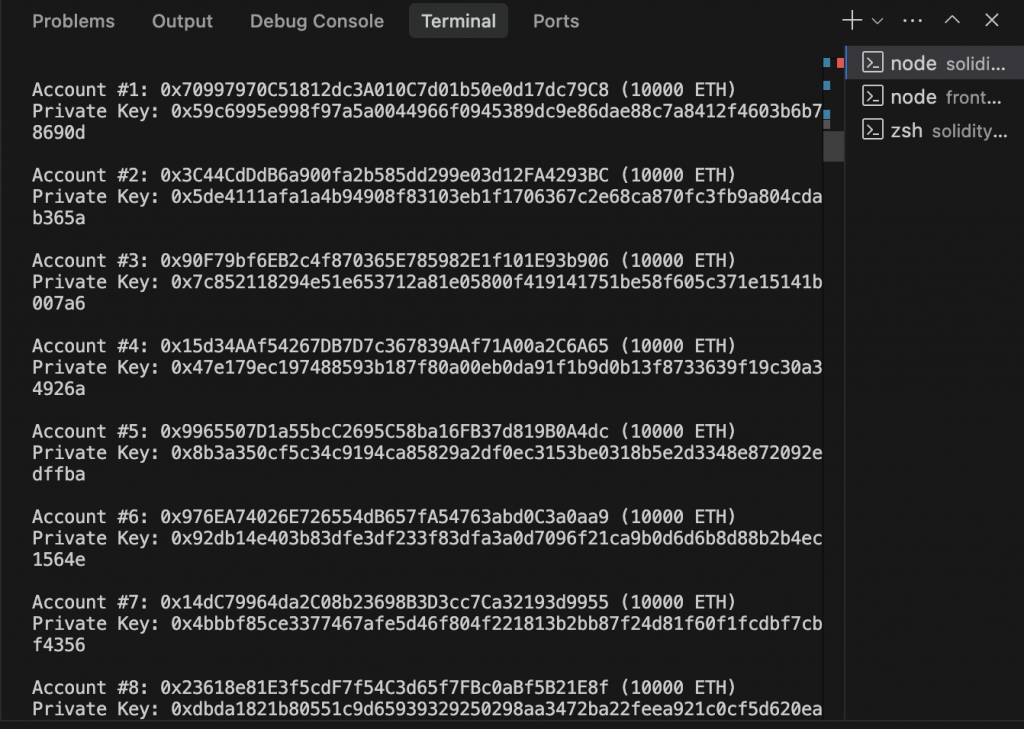
Run a local hardhat node, through which you will get multiple dummy accounts to deploy your contract. The next picture shows you the terminal output with all the accounts generated and their private keys.
npx hardhat node
npx hardhat run scripts/deploy.js --network localhost
Now all you need is to write integrate your smart contract and the front end and run the staking platform application to see if the code for our staking platform is working fine.
Conclusion
Building a staking platform is a complex but rewarding endeavor. By understanding each component thoroughly and planning carefully, we can create a secure and user-friendly platform that provides real value to users.
The key to approaching any project is to layout a user flow diagram first and then think of the features to be added why each component is necessary and how it fits into the larger picture. Start small, test thoroughly, and gradually add features as you confirm each part works as intended. Remember, the goal isn’t just to build a platform that works – it’s to build one that users can trust with their assets and that provides real value to the ecosystem.
