
Table of Contents
MetaMask is among the best crypto wallets you can have today. It’s convenient, and more than anything, it is highly safe and secure. As you continue to use the wallet, you can either buy tokens or swap tokens on it. And so, in this guide, I will share how to buy and swap tokens using MetaMask in the easiest way possible.
In terms of use, the wallet can be used as a simple browser extension, or even via mobile app. If you haven’t added tokens to MetaMask and need to add existing ones, learn to add tokens to MetaMask here.
How to buy tokens on MetaMask
Let’s say you want to buy tokens using MetaMask. In this case, you have an option to deposit ETC or any other ERC-20 compatible token into your wallet.
There are two different payment gateways available for you to use and buy MetaMask tokens. They include Transk and Wyre. Let’s dive deep and explore the steps you should follow, in detail.
1. Go to MetaMask
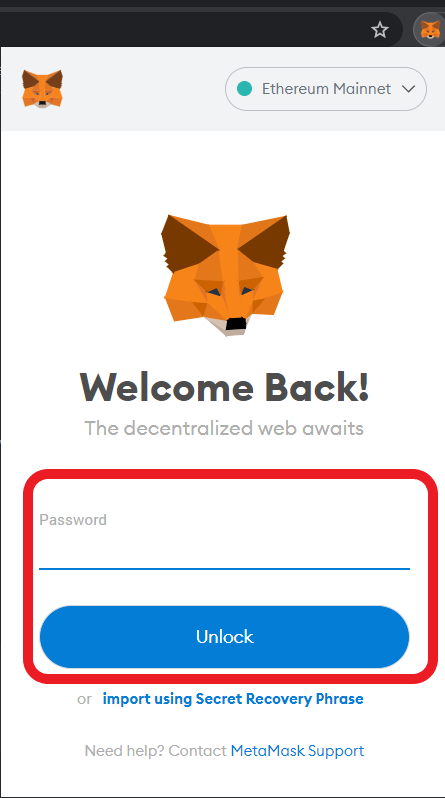
As the first step, you should go to the MetaMask extension on browser. You will be asked to enter your password to unlock it.
2. Click on Buy button
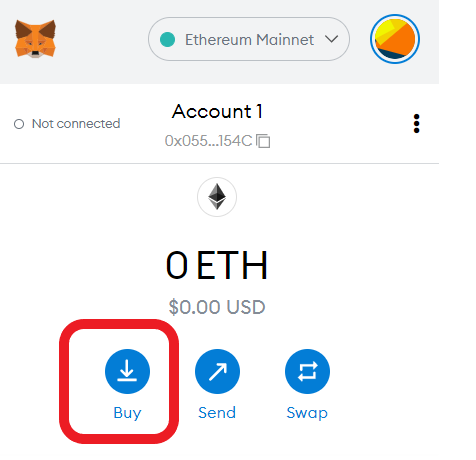
Secondly, you need to click on the buy button. This button is available on the front page of your MetaMask wallet. It is located just under the balance.
3. Click on “Directly Deposit Ether”
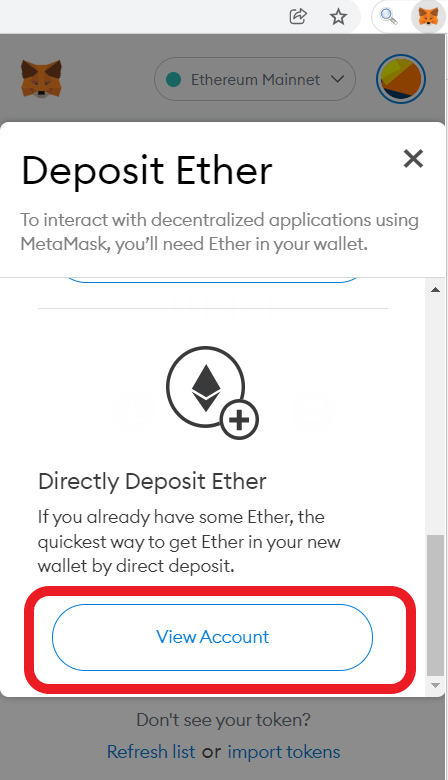
Scroll down for a bit and you can see a label named “Directly Deposit Ether”. Click on the “View Account” button located under it.
4. Copy the MetaMask address
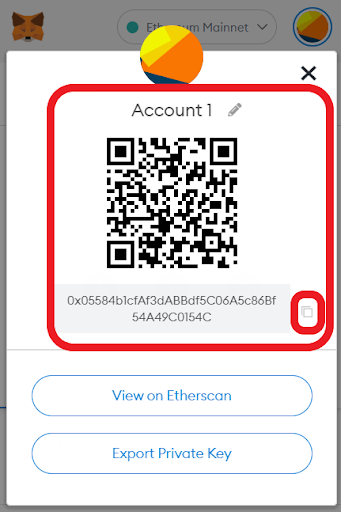
Once you click on the View Account button, you can see a QR code. Along with that, the wallet address will also be visible to you.
5. Go to your crypto exchange and buy
Once you copy the Wallet Address, you can go to your crypto exchange for purchasing the tokens. You can click on “Send” option available in the crypto exchange, enter required information including the Wallet ID, and hit on Send button.
6. See funds arriving at the MetaMask wallet
You need to allow some time for the crypto exchange to initiate and complete your transaction. It will happen through a payment gateway such as Wyre. The Wyre payment API would accept the bank transfer or card payment and deposit the amount of ETH you purchased to your MetaMask wallet. You can log into the MetaMask wallet and see it.
How to buy tokens on MetaMask with Wyre
Wyre is a financial technology company that provides a platform for fast, secure, and compliant transfer of money globally. It offers a range of services, including international wire transfers, cryptocurrency trading, and payment processing.
You can use the Wyre payment to buy MetaMask tokens. This would be a great option to consider, especially if you are looking to purchase MetaMask tokens via bank transfer, Apple Pay, credit card, or debit card.
Here are the steps that you need to follow.
1. Go to the MetaMask wallet
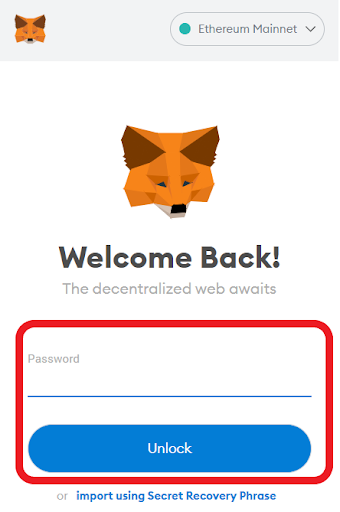
First of all, you should open the web browser and then launch MetaMask wallet extension. You can enter the Password and hit on Unlock button.
2. Click on the Buy button
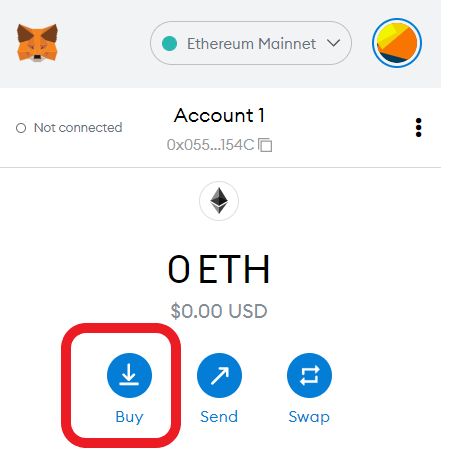
Next, you should click on the button named buy. This is one of the three buttons you can see.
3. Click on “Buy ETH with Wyre”
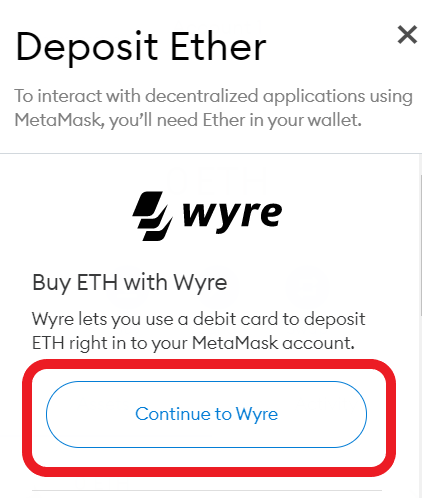
Now you need to select the option named “Buy ETH with Wyre. After that, you should click on “Continue to Wyre” button.
4. Pick a payment method
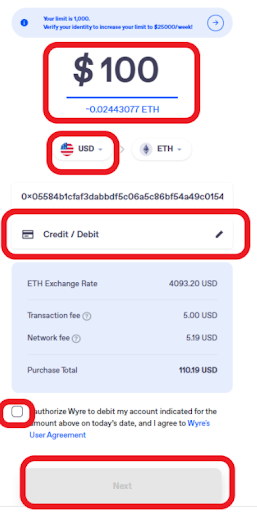
Now you will notice that you are being redirected to a new browser tab. This is where you will need to select the preferred payment method. You will also have to enter the amount and currency on this window.
You can get multiple payment options in here, including ACH transfer, Apple Pay, and Credit/ Debit cards. Depending on the payment method you select, the fee would vary. You can clearly see it when you are about to buy tokens.
5. Fill payment details
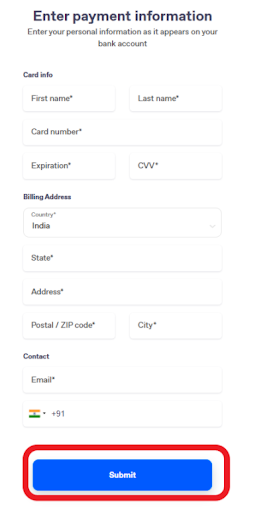
Depending on the payment method you select, you will have to fill payment details. For example, if you selected credit card, you would have to enter your credit card details. After entering details, you may hit on the submit button.
6. Verify the payment
If you entered your credit card number, the bank would send a OTP for you to verify the transaction. You should enter it.
Wait for the payment to go through and for the transaction to complete. It may take a few minutes for the transaction to complete. Once it’s done, you should see the new tokens in your MetaMask wallet.
7. Check balance on the MetaMask wallet
Now you can go to the MetaMask wallet, where you will be able to see the balance added. If you selected ACH transfer, it would take up to five business days for the transaction to complete. Otherwise, it will happen instantly.
How to buy ETH with Transak
Transak is a fiat-to-crypto platform that enables users to purchase cryptocurrencies such as Ethereum (ETH) with their local currency.
It is a seamless, fast, and secure way to buy ETH and other cryptocurrencies, as it removes the need for users to go through multiple exchanges or service providers. This feature makes it very popular.
Finally, Transak is compatible with more than 60 currencies and available to people in over 100 countrties. Here are the steps to buy MetaMask tokens with Transak.
1. Go to the MetaMask Wallet
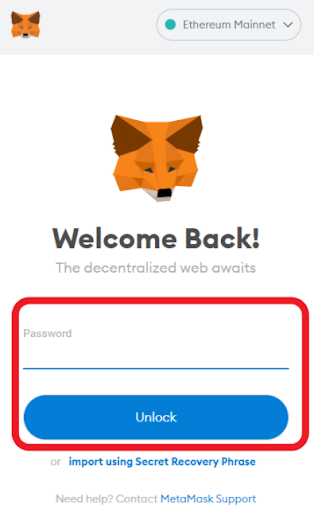
As usual, you need to open the browser and click on MetaMask extension. Before you do that, you will have to enter the password and unlock your wallet as well.
2. Click on Buy button
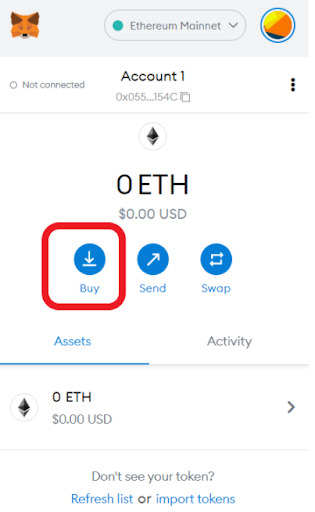
Secondly, you should click on the Buy button out of three buttons you see under the balance.
3. Click on “Buy ETH with Transak”
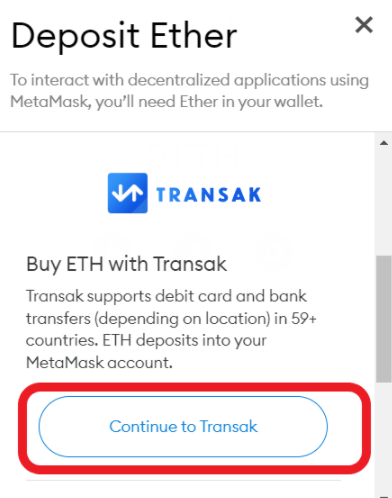
Next, you should scroll down, until you see the option “Buy ETH with Transak”. Under that, you can see a button named “Continue to Transak”. You should click on it and then proceed.
4. Enter the amount you wish to buy
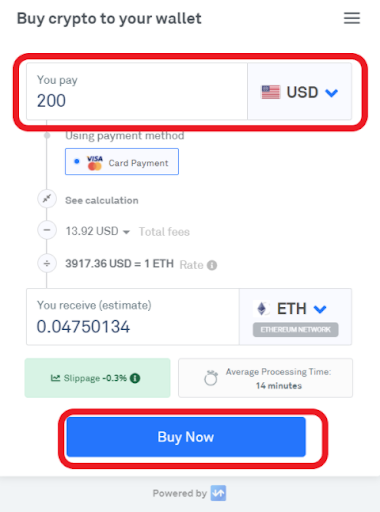
Now you will be taken to a new browser window. This is where you should specifically enter the number of tokens that you wish to buy. You will also be able to select from multiple currencies available on this list. After you enter the amount, you can click on the “Buy Now” button at the bottom.
5. Double check your MetaMask wallet address
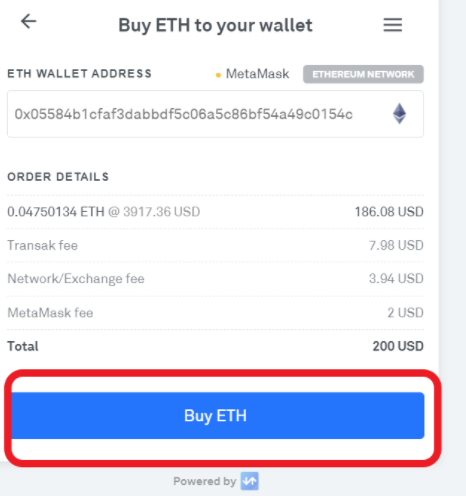
Now you will be able to see the MetaMask wallet address as well as order details. MetaMask will automatically fetch your address and you just need to verify it. After quick verification, you may click on the button named “Buy ETH”.
6. Enter your email address
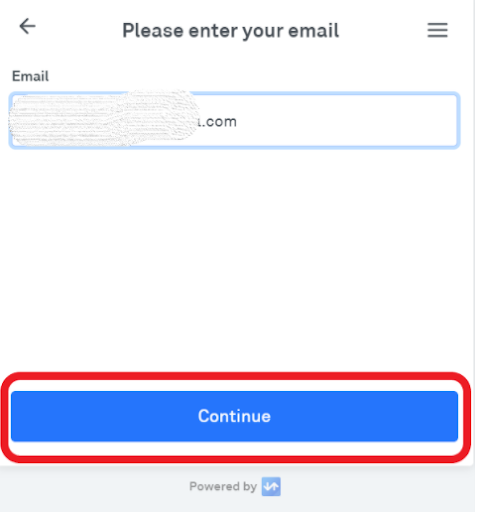
In the next step, you will be asked to enter the email address you used to sign up with the MetaMask wallet. Upon entering the email address, MetaMask will send a verification code to your email inbox. The email will trigger as soon as you click on the continue button. In the next window, you may enter the email address.
7. Complete your KYC
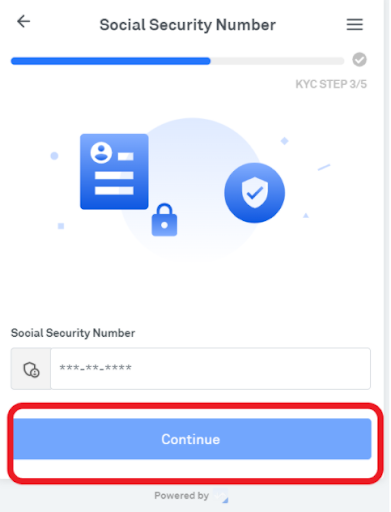
Next step would be KYC completion. This will be a lengthy and a five-step process. Hence, you will have to spend a couple of minutes on it. During the KYC process, you will have to enter some personal information, such as ID proof, address proof, and SSN number. There is no need to worry too much as you enter your personal information as everything is safe.
8. Complete the payment
Once you are done with KYC verification process, you may complete OTP verification triggered by the payment gateway.
9. Check your MetaMask wallet
Now you may check your MetaMask wallet, and you can see the amount added into the ETH balance.
Note: It’s important to note that Transak operates in compliance with relevant regulations, and the process for buying may vary depending on your country or jurisdiction. Be sure to read the terms and conditions, and understand the fees and risks involved before making any transactions.
How to swap tokens in MetaMask
Token swapping is the process of exchanging one type of cryptocurrency token for another within your wallet. You can do so in order to diversify your cryptocurrency portfolio or to take advantage of better market conditions for a particular token.
Similar to buying tokens, it is also possible for you to swap tokens using MetaMask. Here are steps on how you can swap tokens using MetaMask accordingly.
1. Go to the MetaMask Wallet
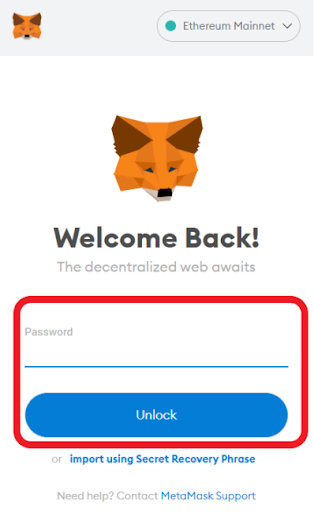
First, you should open the browser extension and go to the MetaMask wallet. You can enter the password and unlock it.
2. Click on Swap button
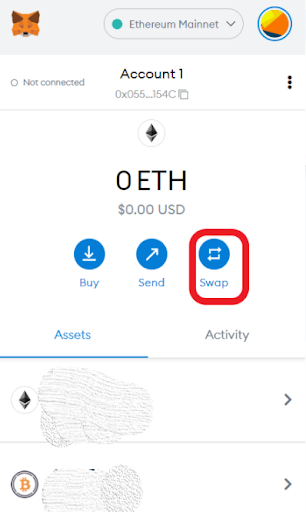
Out of three icons, you should select the last one, which is “Swap”.
3. Select the token
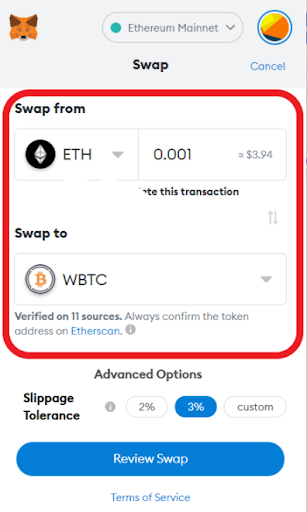
On this window, you will be able to see two different fields. One field is “Swap to”, whereas the other one is “Swap from”. You will need to enter the token that you wish to swap in the “Swap from” field. On the “Swap to” field, you should enter the token that you wish to receive with swapping.
4. Configure Advanced Options
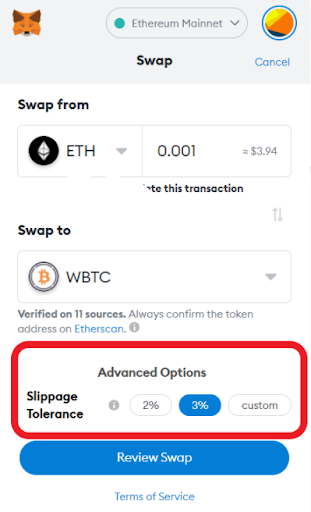
Now you can see that there’s an option for you to define the custom slippage percentage. It will take some time for the order to complete when it goes from order confirmation stage to the order execution stage. During this time period, price of the tokens can change. This change in price is known as slippage.
You will be able to define a slippage tolerance through this option. In case if the slippage exceeds your defined limit, you can get the swap order to cancel. You can use this option to stay away from losing money unnecessarily.
5. Review Swap
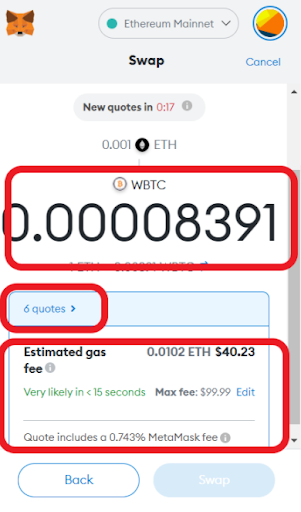
You can now review your token swap and all other details related to it. All you have to do is to click on the “Review Swap” button, where MetaMask will grab quotes from different individual DEXs and decentralized exchange aggregators.
In a moment, you can see the best available quote and the gas fee linked with it. The quoted price would include the fee of MetaMask as well. You can go through all available quotes and proceed with the most comfortable one out of them.
6. Swap the tokens
If you are okay with everything, you can simply click on the “Swap” button. After that, you can complete the transaction. In fact, MetaMask will transfer your tokens and help you with getting the new token you requested.
Final words…
We’ve shown you how to buy and swap tokens using MetaMask. As you can see, the overall process is simple and straightforward. Follow these steps and proceed with your transactions on MetaMask Wallet without a problem.
Thanks for reading, see ya later! 👋🏼