
Table of Contents
MetaMask isn’t just a crypto wallet. It is a tool which provides you the chance to manage multiple crypto wallets. On the other hand, you can also use MetaMask to interact with different dApps (decentralized applications).
Once you start using it, you will be able to unlock different wallets which you can use across multiple dApps that are available within the ecosystem.
What exactly is a custom MetaMask network?
A custom MetaMask network is a user-defined network on Ethereum that has been added to the MetaMask network list. MetaMask is a browser extension that allows users to interact with the Ethereum blockchain and access dApps on the web. It includes a customizable network list, which allows users to select which Ethereum network they want to connect to.
Custom MetaMask networks can be any Ethereum network that is not already included in the default MetaMask network list, including private Ethereum networks, local development networks, public test networks like Goerli and Sepolia, and other public Ethereum networks.
👉Popular course: Create an ERC-20 token in Clarity on Stacks blockchain
When a user connects to a custom MetaMask network, MetaMask will communicate with the Ethereum node specified in the RPC URL and use it to send transactions, read data from the blockchain, and interact with smart contracts.
How to change your MetaMask network – Switch Networks on MetaMask
Let’s first take a look at how to change your MetaMask network. Follow these steps and you can get the job done with ease.
1. Open your MetaMask wallet
The very first thing you should do is to open your MetaMask wallet. If you don’t have it installed and configured, you can follow our quick MetaMask setup tutorial.
Once all is set up and done, open up your web browser and select your MetaMask wallet.
2. Change the MetaMask network

When you open your MetaMask wallet, you will be able to see your current network at the top of the display. You can click on the down arrow next to where your current network is mentioned. After dropping down, you will see a list of different available networks.
3. Select a network and change
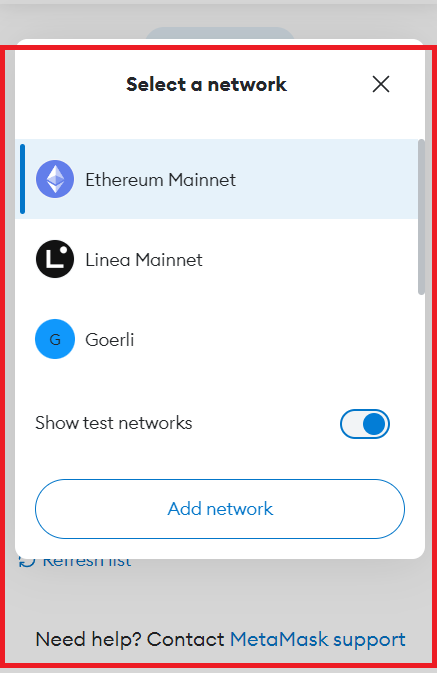
All you have to do now is to select a network out of the options that you can see in here and proceed with changing the network. The MetaMask network change will happen immediately. ✅
🚨 Do note that testnets like Kovan, Rinkeby, and Ropsten have been deprecated as of 2022. Goerli also deprecated in Q1 2023. So while looking for Ethereum public test networks, you will most likely have to check out Sepolia now.
How to add a new MetaMask network
In case you want to add a new MetaMask network, even that is possible. Follow these easy steps and you’ll have it done in no time!
1. Open the MetaMask wallet
To add a MetaMask network, you should open your MetaMask wallet. In order to do that, you should go to your web browser and open your wallet.
2. Go to Settings and select Network
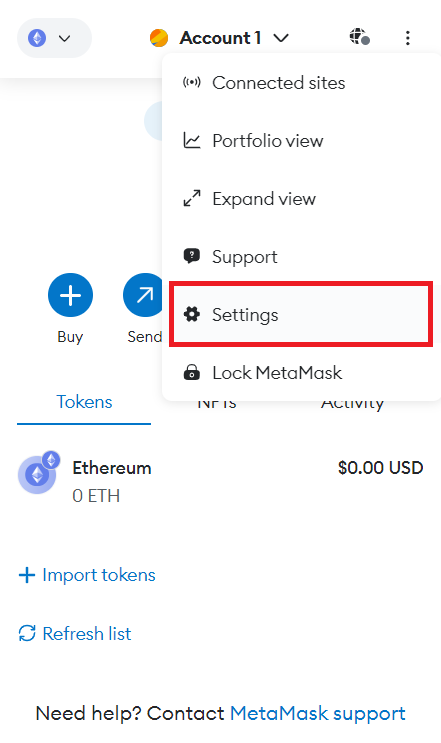
Next, click on your profile picture, which you can see on the top right hand corner. Doing so will allow you to navigate to Settings in the pop-up menu. When you’ve clicked, select the option saying Networks.
3. Click on Add Network
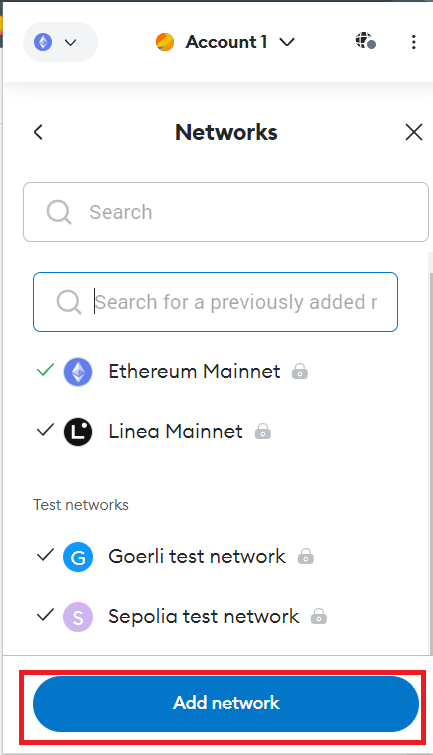
Once you select Networks, you’ll see all the networks that you have added. On the bottom of that menu, you can see a new button named “Add Network”. You may click on it and proceed with adding a new network.
😲 Explore this course: Create your first fungible token on Flow blockchain.
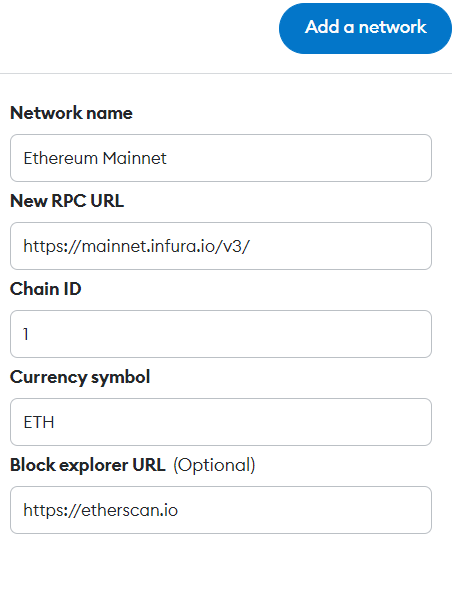
When you try to add a new MetaMask network, you will need to enter some information. That includes:
⚡️ Network Name – You can select any name for the network. However, I encourage you to add a meaningful name, so that you can easily figure it out.
⚡️ New RPC Rule – the RPC would be a URL, which will act as the entry point into the blockchain.
⚡️ Chain ID – This is a unique ID number, which is provided by the blockchain network that you interact with.
⚡️ Currency Symbol – This is an optional parameter. You can pick an appropriate symbol from the ticker.
⚡️ Block Explorer URL – This is also an optional parameter. It is a URL that you can use to access a block explorer. If you wish to get detailed information with related to transactions, you may think about using this feature.
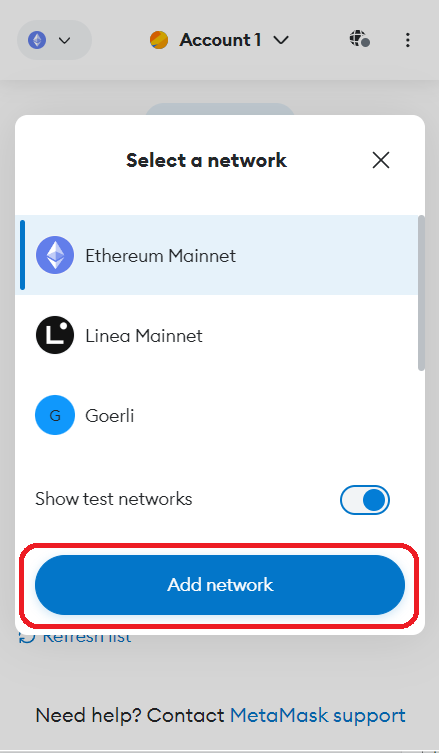
🔮 Or – alternatively, can just click the icon on the top left corner (on the Ethereum icon) and click “Add Network” which will lead you to a different window where you can input relevant details of your desired RPC chain, skipping the aforementioned steps.
4. Click on Save
Once you are done with adding the network, you may click on the Save button. Doing that will let you see your newly added MetaMask network under the network selection.
🔮 Explore this guide: 7 different MetaMask networks and how to use them
Final words ⚡️
Now you’ve been made aware of the most common MetaMask networks and how you can add any of them to your MetaMask wallet. You can proceed with adding any compatible network based on your preferences.
Thanks for reading, see ya later! 👋🏼
FAQs
How to add Binance Smart Chain to MetaMask?
Adding and integrating Binance Smart Chain (BSC) to MetaMask barely takes a minute if you know how to do it. To connect BSC to MetaMask, open the MetaMask extension, go to Settings > Networks > Add Network. Enter the BSC network details (if BSC is not on the list, you will have to manually add the details) like RPC URL and Chain ID which you will find here.
How to add Polygon to MetaMask?
Knowing how to connect Polygon to MetaMask can greatly help you in building potential projects such as launching your own token. All you need to do is follow a few simple steps. First, open the MetaMask extension, go to Settings > Networks > Add Network. Enter the Polygon network details (if Polygon is not on the list, you will have to manually add the details) like RPC URL and Chain ID which you will find here. Save the network and you will be able to use Polygon with MetaMask.
How to add Avalanche to MetaMask?
Whether you are want to write a smart contract or create an ERC-20 token on Avalanche, you will always need to connect to the MetaMask wallet to proceed with building your project. To connect Avalanche to MetaMask, open the MetaMask extension first, go to Settings > Networks > Add Network. Enter the Avalanche network details (if Avalanche is not on the list, you will have to manually add the details) like RPC URL and Chain ID which you will find here. You can now save the network and use it with MetaMask.
How to add base network to MetaMask?
Steps to Add Base as a custom network on MetaMask Wallet:
1. Install and open the MetaMask browser extension.
2. Open the network selection dropdown menu from the extension.
3. Click the Add network button and select Add a network manually.
4. A dialog will appear, enter the following information for Base mainnet:
Network Name: Base Mainnet
Description: The public mainnet for Base.
RPC Endpoint: https://mainnet.base.org
Base Chain ID: 8453
Currency Symbol: ETH
Block Explorer: https://base.blockscout.com/
6. Tap the Save button to save Base as a network.
You can now connect MetaMask Wallet to the Base by selecting it from the network selection dropdown.
How to add different blockchains to MetaMask?
Adding Blockchain to a MetaMask is same as adding new network onto your MetaMask Wallet or switching MetaMask Network. Once your add add different blockchain to your MetaMask Wallet, it is intuitive to use MetaMask switch network from the extension. Here’s how you do it: Go to MetaMask Wallet extension, click on settings and select “Add Network”, enter RPC URL and other details, and click “Save. 